.

.

Wednesday, August 13, 2014

Best day! Announcing my brand new workshop with Big Picture Classes!


This is so amazing. I have worked so, so hard at this. And it came at the most amazing time. I created a wonderful, vibrant brand new workshop with Big Picture Classes. It's called Art&Design and it's all about balancing Art Techniques with good Design. The class will run over 4 weeks and every week we will be looking at a new design principle. If you love my videos and scrapbook style, you will LOVE this class. 

The class by numbers:

  • 4 weeks long (Registration is now open. But it closes October 1st)
  • 5 Layout videos per week (around 90 minutes of video every week)
  • 1 Weekly Bonus video where I will chat about techie stuff (I love that)
  • 2 Video chats (in real life)
  • Weekly handout - a beautiful 8x10 pdf
  • Weekly bonus products. This will blow your mind. In total I created 23 cut files and 6 printables. And these are beautiful, hand made (drawn, painted) and unique. AND they are included in the class.


I can honestly say, it's the most beautiful work I have ever done. I am so happy about it. I am so, so thankful to Stacey Julian for giving me this opportunity. She really gave me something to focus my mind on this past 8 weeks. Thank you Stacey! (and Brandi and Kayce)(insert red hearts here)

And YES! I have a bonus something for you if you use ANY LINK from my blog to register for the class. 

I am really thankful for affiliate links. It's what helps me pay for hosting my sites and equipment. It helps me to do what I do. And I an thankful if you buy my workshops through my links! 

DO THIS:
So, as with all my other classes, if you buy the class through any link on my site, email me your receipt from Big Picture Classes to wilna71 (at) yahoo (dot) ca (not com). I will in return email you back a sincere thank you and a link to a special page (please don't share it) I created for a workshop in Germany and Barcelona. It's one of my favorite pages I have made and would love to share it with you.  The page has a 20 minute video and I explain some cool techniques. I hope the girls from Spain and Germany will still love me and get the class through my blog anyway. 

Go to the classroom and see and read all about the Art&Design workshop. I will be here to answer any questions. Go and watch the little promotional video I created and just all the fun things surrounding the workshop. I am so so so happy right now. And so excited.

Please be sure to follow Big Picture Classes on Instagram as I will be a guest Instagrammer next week and I will share lots of sneak peeks of the class.

Oh, and of course I am giving away one spot in the class today. Just leave a comment. yay!


Much love
Wilna Furstenberg
iheartblog


UPDATED: The winner is glee stormont. Comments now closed.

Monday, August 11, 2014

Summer Guest Post: Meagan Whelan

Meagan Whelan, 32 year old momma to 2 girls under 3 (wow! That seems so much older when I read that on this screen) Milly is 3 next month; Lexi is 7 months old.  Both spunky, crazy little balls of love. 
Happily co-habitating with the man of my dreams, he's goofy, charming, supportive of my crafty obsessions and the best Daddy ever! He wears green any chance he gets ( Go Riders!). 
We live in Calgary, Alberta (Canada) in an inner city community. I grew up on an acreage in southern Alberta and Rody is a good old Saskatchewan boy (pronounced Roadie). 
You can find me on Instagram (_Mugsie82) and Pinterest (Meagan Whelan)
I Heart scrapbooking (of course), thrifting/garage sale stalking and decorating our home. 
I despise mice! Yuck!! They give me the heebie jeebies.
When it comes to food I am loving all things Thai right now. 
What I'm listening to on my iPad right now: Minnutes (so fun!)  
My guilty pleasure: birthday cake Oreos and Coffee
Something I'd love to learn, when I have some spare time, is how to Blog. I'd also like to keep learning more and more about photography, something I hope to one day do more of. (Another thing you inspire me with Wilna) :) 


Some page instructions:

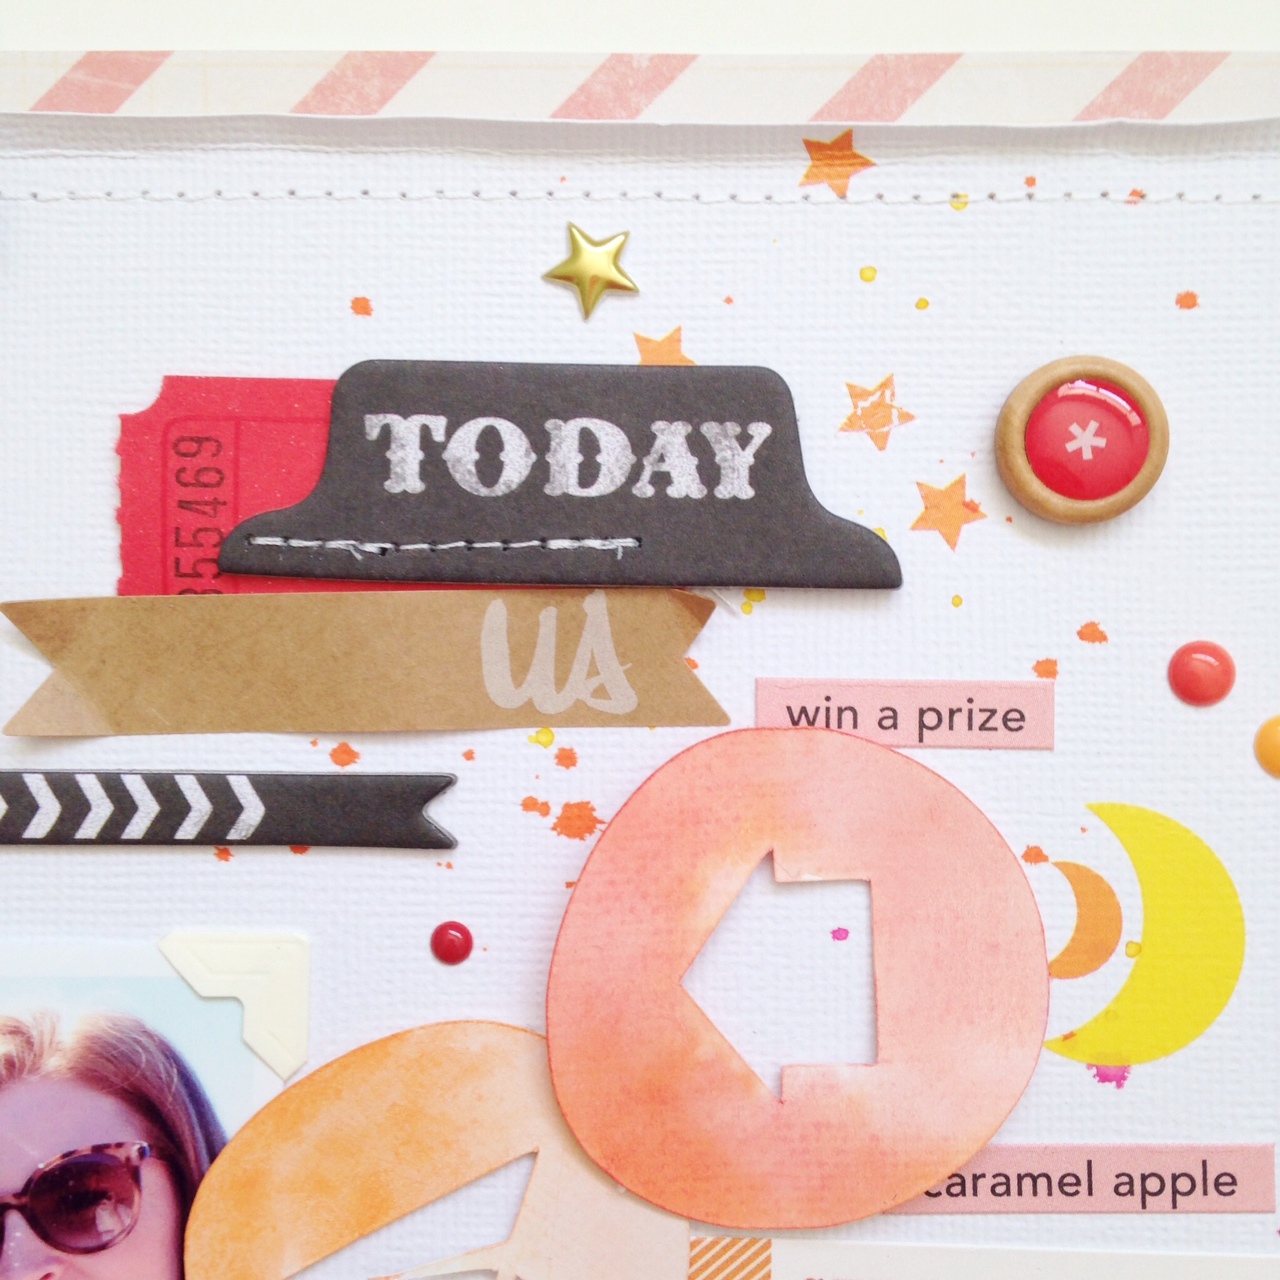
I started out wanting to make a page that somewhat reflected your speech bubbles page from your July 9th blog post but ended in something totally different. I knew I wanted to use some of the chalk studio chipboard by Rhonna Farrer and MME that I've been hoarding and some cameo cut outs on my desk (Wonky Circles By In A Creative Bubble for Studio Calico). I water coloured them with Mr. Huey's water colours, used hot glue and foam squares to lay them down into a random vertical cluster, leaving space for some embellishments. First I spritzed ink, in the colors of the rainbow, where I wanted to glue down the paper cuts (using StampinUp re-inkers that I've had for ages). I rifled through my stash and pulled out some bright summery embellishments from my stash then printed my photo in a 5x7 collage (iPhone photos, made collage in PicFrame app & printed on my Canon Pixma MG7120). Attached my photo with photo corners (thanks for reminding me about those Wilna!). Picked out some stickers, rub-ons, chipboard stickers, enamel dots, brads and a vintage ticket. 


 Glued, stuck, sewed and rubbed them on in the color families where they belonged most. Stamped the date on a gold tag, sewed it on. Fussy cut a cold vellum doily out (from Maggie Holmes vellum paper) and layered it with a red one which I sewed on at the top of the page. Then I went through a gazillion patterned papers before choosing a pink and cream striped Maggie Holmes paper to mount the layout to. Cut 1/2 an inch or so off from all 4 edges of the white layout page and sewed it to the patterned paper. Journaled on a large Studio Calico tag, added black and white baker's twine and stuck it behind the photo, nothing fancy. Distressed the edges of the white paper slightly and voila!
Psst! I cut out a big square from the middle part of the patterned paper so I can use it for layering on other projects ;) 

Thanks!
Meagan

Friday, August 8, 2014

Summer Guest post: Natalie Elphinstone

Natalie Elphinstone is a 30-something mother of two beautiful girls from Melbourne Australia. She works full time as an Obstetrician and Gynaecologist but still finds plenty of hours to play with pretty paper too. Natalie is currently a Studio Calico Creative Team Member and a Scrapbooking Memories Master. She blogs at www.onescrappydoctor.com


“Speedy Scrapbooking” by Natalie Elphinstone

Hello everyone! I’m waving madly with excitement at you all the way from Australia, as I’m feeling very lucky to be a guest here today. Thankyou Wilna for letting me take over your blog for a little minute!
Like many of you I’m a busy Mum who works outside the house and there often doesn’t feel like there’s enough hours in a day. But I love my scrapping and I always manage to find time for it. Sometimes however, that time isn’t very long and so I’ve learnt a few tricks to allow me to get a layout finished quickly whilst still enjoying the creative process. Today I wanted to share with you a couple of ways I use to speed up my scrapbooking.


Step one for me is about choosing a colour combination to work with. It doesn’t really matter what inspires the combination – whether it’s pulled from a kit, a particular collection, something I’ve pinned, or even the photo I’m scrapping. What’s important is that I’m giving myself a clear direction of what the overall feel of this layout is going to be. The colours I choose really help set the mood of the page, and this red, pink and mint tell a happy story. I don’t always need to visually represent my colour combination, but I do find it helps me focus if I actually pull out my swatch book.


Next step is to gather some supplies that match the colour combination I’ve chosen. I pull out everything I commonly use on my layouts such as papers, journaling cards, stickers and bits of bling. I include some neutral products too such as black and white papers, and some wood veneer. I found out that if I gather a reasonable pile at this point then I construct my layout using only these supplies. If I skip this step then I spend more time later hunting down that elusive pink whatever that just might be perfect, and trying out a hundred different things that I come across in the process! I particularly find if I’ve chosen my colour combination from a kit in the first place then this gathering process can be really quick as I just pick out the bits that match. For example, everything you see here comes from the Studio Calico Penny Arcade Scrapbook Kits and Project Life Kit.


Now let the fun begin! Construct your layout’s basic design however you normally do. I’ve figured out that currently I’m happiest if I use lots of layers of papers and journaling cards, but keep them all lined up with straight edges. So I stick with what I know. This also means that the design of this page is one I’ve done before in many different variations, but it’s one that I know works for me. Each time I do it though the end result looks completely different anyway because the supplies always push me in varying directions.


It might seem a little backwards to build a page like this, but I’ve always started with my layout design first, and then figured out where I need to put the background details! With this layout I realised that all my layers were focussed in the centre and my edges seemed a little bare. So I went ahead and added some colour to the top and bottom.


I chose my three Color Theory Inks that I used to inspire my combination in the first place (Well Red, Blush Crush and Mint Hint) (http://www.studiocalico.com/shop/ink-pads?aff=natalieelph ) and stencilled in a whimsical pattern of clouds.


And then essentially my layout was finished. All it needed was a title and some journaling, without which a layout of mine never feels complete.


Here’s the final page:


I didn’t put a timer on but I would estimate all of this took me under an hour to complete which is pretty speedy in my books. I’m usually a good 2-3 hour per layout kind of girl, and mostly that length of time can be racked up to the indecision that comes with facing a million choices of product. Ultimately the success of speedy scrapbooking for me comes down to limiting my choices. I can still be adventurous and I can still be creative, perhaps even more so, when I ‘force’ myself to work within some boundaries!


I would love to hear from you if you have some tips of your own on how to achieve Speedy Scrapbooking. What tricks have you learnt along the way? Is there a specific technique you fall back on time and time again? What works for you?

Thursday, August 7, 2014

Summer Guest Post: Maria


Hi!!! My name is Maria, I'm musician and I live in a little apartment in Barcelona with my cute cat, MimĂ­. I play the piano since I was 8 years old, now I teach music in a school. I discovered scrap 4 years ago and now I can say: I'm scrap alcoholic!!!!! Yes, I love to spend my time among my papers, stamps, inks, etc!!! I love my blog too, there you can find scrap, art journal and other things, my favorites: music, cinema, quotes… In my layouts I usually use glitter, splashes, lots of stamps and cut files, gesso, molding paste, watercolors... I love mixing techniques!!! I use to take pictures from everyday, going to work, walking in my beautiful city, my favourite things, like this picture, this is one of my addictions, the gorgeous Sonny Angels, these little dolls, I love ice-cream and frapuccinos too, and spending time with my family and friends.


It is a huge pleasure to be on my dearest Wilna's blog! When I read she needed some projects I did not hesitate a second!!! I met her personally when she gave a workshop in Barcelona, she is so creative and sweet!!!! I love her amazing cut files!!!! they are absolutely awesome!!!! In this layout I've used the flowerpot cut files, these flowers are gorgeous and they've covered my background. Let's go for it!!!


First, I applied a thin layer of gesso and then added the flowers to make the composition, we need to distribute the flowers around the picture.


Once the flowers where placed, I added another thin layer of gesso, which will glue the cut files and add extra texture. 

Then, I placed the picture with some pieces of paper and decorated it with chipboards from the Flea Market collection from Maggie Holmes for Crate Paper. I love the chipboards because they give more dimension to the page.

Then comes the moment of the glitter!! This word from Dear Lizzy was great for the page, wood embellishments are so versatile, you can paint them, stamp over them, etc., so I decided to paint this with gesso and then added some gold glitter, only in the bottom half of the word, I used some spray adhesive to do this, I love the effect. 


To finish the Layout I added some glitter splashes, mixing some glue and water and voilĂ …the page is ready!!! I hope you like it!!! 


My social media links are:


Thanks Maria! And that night in Barcelona was for sure one of my favourites ever.
Wilna Furstenberg
iheartblog

Wednesday, August 6, 2014

Just Popping in!


Hello!!!
I can bury myself in my work and then suddenly I just want to be super social! So, this is me being social. Like I have hinted numerous times, I am working on something super cool and lovely and exciting that will be revealed (hopefully) by the end of next week. You can see a sneak peek here. (!!!!!) All I can say is that it involves scrapbook pages and I have to admit my favorite ones that I have ever created. I really feel that when you work so much things only get better and more beautiful!

Remember to come here next week. OKAY? okay.

Anyone want to guess what I am doing? Leave me a comment and I will pick a winner randomly next week to win some cool stuff like already cut out cut files.

Secondly, I was on the paperclipping roundtable last week. Yeah. I was the one that got bleeped for saying a bad word that I really did not mean to say. (insert laughing with tears icon here)
Click over to the paperclipping.com and go and listen.

If you really don't want to miss my big announcement, please be sure to follow me:

Twitter
Facebook
Instagram
Youtube

More Good news! I heard from 2peas that they will be giving me the full rights to my 2peas workshops! I am finalizing my ideas on how to proceed but how ever I do it, it will only be done in the fall (October/November). So, thank you for your patience but know that the content you paid for is in my hands and as safe and sound as can be. I will have to edit some of the content to reflect the new home and that will take some time.

Then, lastly but NOT scrapbooking related, a friend and I started a little Wedding Photography Business. I am such a romantic soul and love photographing weddings. Please have a look at our Soul Wedding Photography Facebook page and it would mean the world to us if you like it! (insert 10 red hearts here)

Talk soon... AND I AM so so so thankful for my Summer Guest posters. How awesome are they?

Next week okay!!

Wilna Furstenberg
iheartblog

Updated: The winner is

PJ said...

Super sneak peak!!! I'm guessing you got a line of your own stamps????? Or maybe a complete scrapbook line??? Cannot wait to see what it is? And super yay for getting the rights to your classes! I'll wait patiencely when acces to them is ready, although that's very hard, because I totally love them! (got them both!!!)